
 When I was little, my dad would take me to Radio Shack. We’d buy some wires, batteries, lights, annoying little piezo buzzers and wire everything together at home.
He would mount everything on a piece of plywood and we’d play space shuttle, pushing the buttons, flipping switches, and generally going nuts.
Two Christmases ago I got an Arduino, which is basically this on steroids. It connects to the internet and has its own programming language. You can use it to open your garage door or turn on a pump to water your plants when the soil gets dry.
With a 3 month old baby at home, a mysterious hormonal switch flipped inside me a couple weeks ago. It was time to get up to speed on this electronics stuff. Maybe so I’ll know enough to teach my son when he gets older. Or maybe so I won’t be that old guy yelling “get off my lawn” at some confusing new smart gizmo a few years down the road.
Either way, I took my Arduino kit back out of its ziploc bag, dusted it off, and wrote up this little arduino wifi tutorial that allows you to tweet the temperature. More to get my head around it than anything. But it should help you if one of these things has landed on your desk and you’re trying to figure out what to do next.
An Arduino is a “microcontroller.” A tiny computer that lives on a circuit board. It’s about the size of a deck of cards.
It has all the elements of a full computer: a microprocessor, memory, and input and outputs. Microcontrollers are the brains of most household gadgets. They make your toaster toast for the right number of seconds, the motor in your RC car spin at the right speed, and so on.
The microcontroller gets an input from sensors, makes calculations, and sends outputs to things like motors, lights, or screens. The Arduino was first designed for teaching students how to make electronics that interact with the physical world.
It makes this easier by putting all the necessary things to make the microcontroller run (like a power supply, USB cord, and input and output pins) together on one board.
What Can You Do With An Arduino?
A couple examples of the many projects you can make with an Arduino:
| Input | What Arduino does | Output |
| Temperature reading from a sensor | Convert sensor data into Celsius / Fahrenheit | Display the temperature reading on an LCD screen |
| Online source of weather data | Connect to internet using Wifi and format data for screen | Display temperature on a small screen |
| Moisture sensor in plant soil | Detect moisture level, decide if level is below a certain threshold, activate pump if below threshold | Pump adds more water to plant |
For more ideas, here’s a partial list of all the types of sensors and actuators you can control with an Arduino.
The Right Mindset to Approach Arduino
I’m writing this article after giving up on Arduino for about a year.
I was stuck on a project, got frustrated, and put it down.
The project was a simple temperature sensor. But when I put everything together and ran the code, the thing was telling me our room was -299 Celsius. (I know our insulation is bad, but come on!)
I tried unwiring and re-wiring. I tried playing with the code. Nothing. The Arduino went into a big ziploc bag. A week passed, then a month, then a year.
When I got the urge to play with it again, I took it out of the bag and re-wired the same circuit. Same problem.
But I did something different this time. I shot off a quick email to Glenn, the guy who designed the series of tutorials I was going through. After a little back and forth my problem was clear.
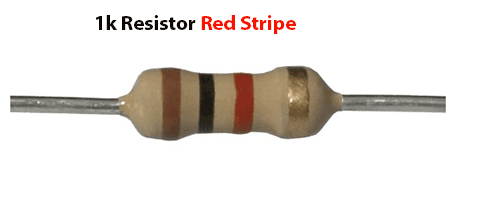
The temp sensor required two 1k resistors. You know what type of resistor you have by the color bands on them. A 1k resistor has a brown stripe, then a black stripe, then a red stripe.
What Glenn was able to spot instantly was that my 1k resistor was actually a 10k resistor, which has an orange band instead of a red. Doh!
I swapped in the right resistor and the circuit worked like a charm.
So what happened was I wasted a year of learning about electronics because I confused a small orange stripe about 1cm thick for a small red stripe about 1 cm thick.
But my real problem wasn’t the confusion about the color. It was my unwillingness to seek help or systematically break down the problem: Is my sensor the right one, is my wiring correct, are my resistors the exact right type, and so on.
For all the talk about how fun and easy Arduino is – make no mistake – this is a highly technical thing. You will make mistakes and run into roadblocks. It’s your job to find the help to overcome them.
If you’re expecting an Apple store experience where everything “just works” you are in for a world of pain.
If you are mentally prepared to spend a lot of time tinkering, troubleshooting, getting help, and trying again – and you can convince your brain this is actually fun – then you are in a good place.
Anatomy of an Arduino
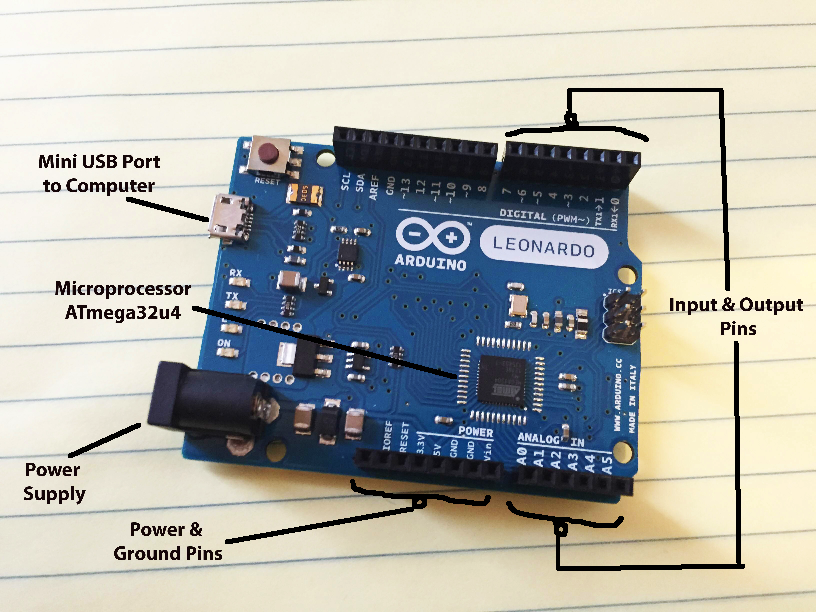
Processor: The heart of the Arduino. This is the single chip that contains the memory and processor to make the system run. Different Arduino models have different core chips. The one above is an Arduino Leonardo board that runs off the ATmega32u4 chip. The chip has 32kb of flash memory and runs at 16mhz.
Power / Ground Pins: These pins allow you to send 3 or 5 volts of positive current out from your Arduino and back to ground. This allows you to power components like LED lights, little motors, etc.
Input / Output Pins: The Arduino also has 14 pins around the perimeter of the board that can receive an input from a sensor or provide an output to a light, motor, or screen. Some of the pins are also able to use pulse width modulation (PWM). This means that instead of a simple “on” or “off” current on the pin, they produce a fast series of bursts that create gradations between totally on and totally off. This is useful for things like dimming a light.
IDE: Short for “Integrated Development Environment.” This is the program you run on your computer to create, edit, and compile the code for your Arduino. Once you have finished, you use a USB cable to upload the code to your Arduino board. Once the code is loaded to the Arduino, it repeats the loop of code over and over until the power is removed, you hit the “reset” button on the board, or you upload a new program that clears out the old one.
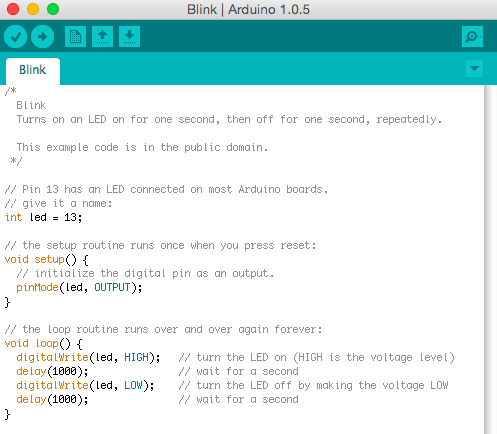
Code / Sketches: The Arduino has its own programming language which is based on C++. The programs (called “sketches” in Arduinoese) must be short because the Arduino has only 32kb of memory.
Power Supply: The Arduino can run on any voltage between 6 and 20 volts, although the recommended range is 7-12V. This can come either from an AC adapter, battery pack, or from your computer through the USB cable.
 Breadboard: This is not technically part of the Arduino, but will save you a ton of time. A big headache with electronics projects is wiring everything together. With most sensors requiring 2 or more connections, this can take a lot of time and be hard to undo if you solder everything together.The breadboard allows you to connect wires and electrical components by simply plugging them into the breadboard. The holes in the board are connected along the horizontal and vertical axes, so you just plug them into the appropriate holes and unplug when done. Big time saver.
Benefits of Arduino
Open Source: The design and code behind the Arduino is all free and open source. There is a huge community of hobbyists and educators using it. They have created a ton of project tutorials, code examples, and forums where you can get help. This huge network is why Arduino is quickly becoming the default method for teaching electronics.
All-In-One: Before Arduino, tinkering with microcontrollers required a lot of overhead to get started. In some cases, a lot of special hardware was required to program the chip. The real secret sauce of the Arduino is that everything you need to get started is right there on the board.
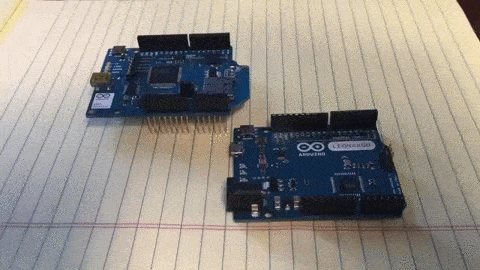
Expandable: Arduino encourages other companies to build equipment that builds on its capabilities. Called “shields” in Arduino speak, these boards mate directly onto the main board like so:
You can get relay shields to control higher voltage electronics, ethernet or wifi shields to connect to the internet, and so on.
An Arduino Wifi Tutorial:
How To Tweet The Temperature From Your Arduino
Most Arduino tutorials start with having you blink a LED light on and off.
This one is a little more advanced and requires more parts, but I think it’s still doable as a first project and more fun since it shows off more of what the Arduino can do.
This project uses an LM355 temperature sensor to measure the temperature (in degrees Kelvin) and then posts this on your Twitter account.
I created this project by combining two other projects. The temp sensor code from Glenn Mossy and this instructables tutorial on how to tweet from the Arduino.
I am also indebted to the Arduino programming forum and subreddit who helped me inelegantly smush these two pieces of code together.
Stage 0: Get Your Stuff Together
You will need these components for the project:
- Arduino Leonardo board
- Arduino wifi shield
- Solderless breadboard
- LM355 temperature sensor
- 2 1k ohm resistors
- Jumper wires
Got all your parts? Onward…
Stage 1: Software, Libraries, Accounts
- Arduino Software. Install version 1.0.3 of the IDE software on your computer. There are newer versions of the IDE available, but the firmware on the wifi shield requires a complex update to be compatible with 10.4 onward. I’m lazy, so I use an older version of the IDE that is compatible with the wifi shield out of the box. Once you have your IDE installed, it’s important to have the correct ports configured so the board can communicate with the computer properly. If you are having trouble consult the specific getting started instructions for your OS. I would recommend doing some of the very basic program examples (like this blinking LED program) to make sure your Arduino is properly connecting to your computer, and consult this troubleshooting guide if anything doesn’t work.
- Twitter Library. The Arduino software you just installed doesn’t include everything you need to tweet. For that we need to add on additional software (called a “library”) that does this. Visit this page to get the Twitter library and follow the instructions there to install the code. You will need to unzip the code and put it in a certain folder so that the IDE can find it.
- Tweak Twitter Library. The twitter library you just installed is set up to work with ethernet, not wifi. So we will need to update it. Download these two files and go to the folder where you installed the Twitter library. Delete the files in there named Twitter.h and Twitter.cpp and replace them with the two you just downloaded.
- Get Twitter Token. You need a way to sign-in to Twitter to post the tweet. To accomplish this, we use an middleman website that receives the data from your Arduino and posts it on Twitter. So sign into your Twitter account and visit http://arduino-tweet.appspot.com. Select “Get a token to post a message using OAuth” and click “Authorize App”. This will generate a code, called a “token” that looks something like this: 6842457-guOuIOQzTuf8GfulnptUFTTXKRx7eX2Qfp. This is a unique code that would give someone access to your Twitter account, so don’t share it. Copy your token to a safe place because you’ll need it later.
Stage 2: Do Some Testing
- Test Your Wifi Connection. One of the biggest things that can go wrong with this project is the Arduino not connecting properly to your Wifi router. So we’re going to test this first and make sure it’s working before going further. So connect your Arduino to the wifi shield (as shown in the gif above) and plug your Arduino into your computer’s USB port. Open this code in your Arduino IDE:
You will need to replace the “yourNetwork” and “12345678” with the name (SSID) of your Wifi network and password, respectively. Leave the quotation marks and the rest of the code untouched. Then click the right arrow button on your IDE to upload the program to your Arduino. Open the serial monitor by clicking the magnifying glass icon in the upper right corner of the IDE. You should see a “Connected to network” message if everything worked right. If not, try the troubleshooting steps found here.
- Test Twitter Posting. Now that we’ve got our Wifi working, let’s make sure we can post to twitter. Open this code in the IDE:
As before, replace “Micromax A52” and “password” with the name of your network and your password. Use the Twitter token you got earlier to replace “Your token here” and edit the text “Automatic tweet!” to whatever message you want to post to twitter. Upload the program to your Arduin, and open the serial monitor to watch your progress. You should see a series of messages and then “OKOK” confirming your tweet has been posted.
Stage 3: Final Assembly
Once we can successfully post to twitter from Wifi, we just need to hook up our sensor to get the temperature. Using your breadboard, wire up your sensor, using the 2 1k resistors as shown in this diagram:
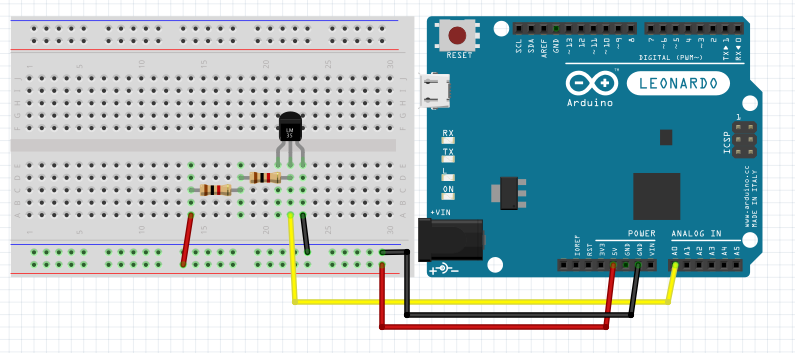
Note: The wires will be going into the plugs on your wifi shield that is mated onto the Arduino, not the Arduino board itself, as shown. The wires should go into the same holes as marked above.
Note From Hard Experience: Make sure you’re using 1k resistors. Other values will screw up the temperature reading.
Stage 4: Put It All Together
Now open your Arduino IDE and paste in this code:
Insert your network name, password, and Twitter token as before.
Upload the code to your Arduino and open the serial monitor to check your progress. Once you see the “OKOK” message, check Twitter to see if your message posted successfully.
The temp will be expressed in degrees Kelvin, which is the output format of this sensor. In my experience, it has a pretty wide range of accuracy. If you are concerned with getting a more accurate reading, there are some upgraded temperature sensors you can easily swap in.
1 thought on “An Arduino Primer (And How To Tweet The Temperature Using The Wifi Shield)”
Hye
I just wondering if you save any data from twitter??
Comments are closed.